From Drab to Fabulous
We've now been in our Las Vegas home approximately two months, and we're making steady progress. Updating the staircase made a HUGE difference, and if you didn't see what $30 can do, hop over to my Facebook profile https://www.facebook.com/val.moody/ or Tik Tok @TomValMAD.
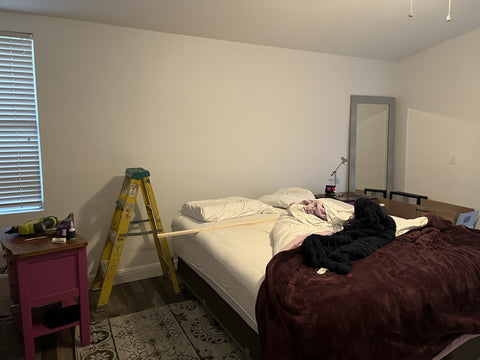
Now that we've got some semblance of hominess downstairs, it's time to make our primary bedroom into a cozy, relaxing space. The "before" was pretty drab and boring, but I knew I wanted to update downstairs first since that's where we spend most of our time.
I have in mind that I'd like to run a sage green throughout the house to keep with the more natural, lighter colors of our warm weather state. I resisted the urge to do yellow and purple, as I did in our home in South Carolina, assuming I'll probably redo the decor in a few years anyway.
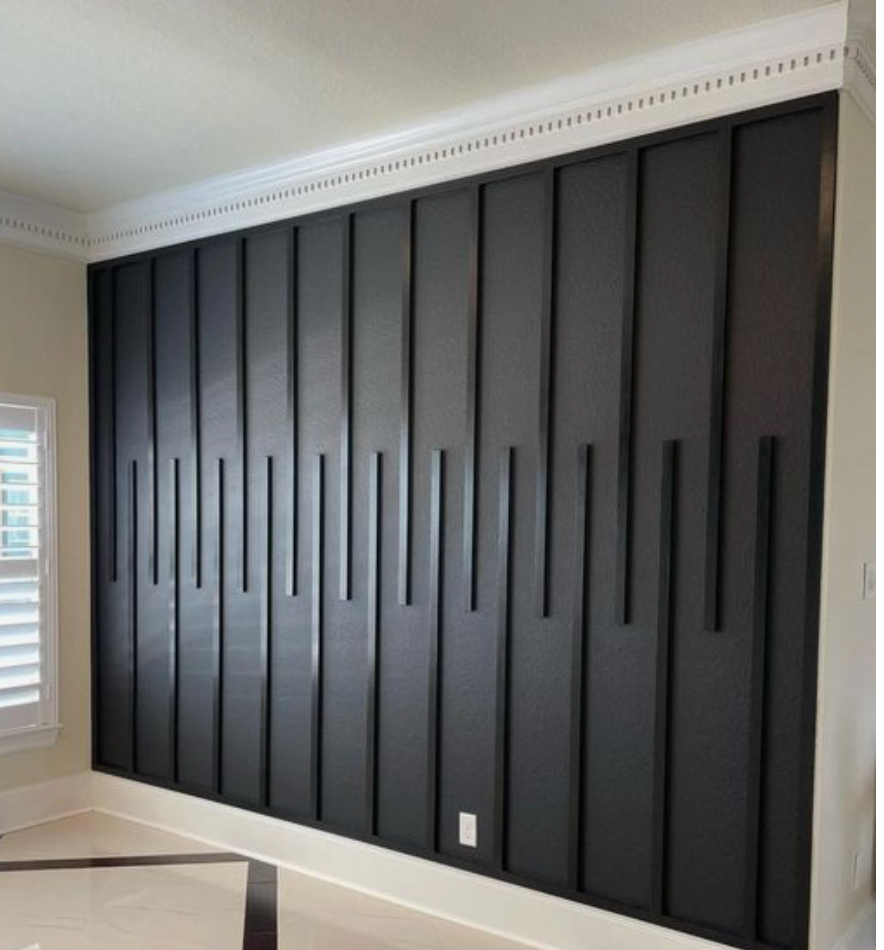
I've wanted an accent wall behind the bed, and I knew I wanted that wall to be a sage color. After studying multiple options on Pinterest, I settled for this pattern, but opted to save over $200 and create the look myself. My only concern is that I hope I don't cover up this great pattern with the headboard too much.

Day 1 - Getting Started
In looking at the design, it appears to be 5 foot boards about 10 inches apart for each row. I measured our wall and determined I would need 12 boards for each row, and Lowe's has some 1x2x8. I wasn't happy about wasting 3 feet per board, but our store didn't stock the 10 foot length. At less than $2 per board, this still seems like a pretty reasonable cost for the project. I realize these are furring strips, but I'm okay with these since I will be using a paint that also has primer, and I didn't want to spend the extra for pre-primed wood.
As usual, I enlisted hubby's help for cutting. He's not always sure about my projects, but he normally goes along with my ideas and is always surprised in the end how much he likes what I come up with.
Pretty boring, but not for long!
First step was to "outline" the area. Our wall was surprisingly level, so that wasn't an issue. I opted to stop just above the baseboard rather than remove baseboard and go to the floor, so I didn't place a board at the bottom, especially since our king-size bed will block most of the bottom anyway.
From there, I started marking the spaces where each board would go. I forgot to get a photo, but one of the best time-saving steps I did was to cut a piece of the trim to six inches. I then used that piece to draw where each board should go and to ensure my measurements had everything centered. I placed the board horizontally butted against the first board, then marked the end of the 6-inch piece. I turned it vertically, and marked the edge so that I would know where to place the end and repeat the steps. At the end of this exercise, I could see where each board would go. I then alternated between nailing (using a nail gun and finishing nails) the top and bottom pieces.
Then on to caulking every side of the boards - yikes! Yes, it's time-consuming, and it makes the boards more permanent. I'm always changing things, so I was a bit concerned about the hassle of removing the boards with so much caulk attached. But the extra work really does give it a nicer, smoother look once painted. I only finished halfway before using up an entire tube, so I'll need to make another trip to Lowe's before I can finish. The extra trip is fine, though, since I've decided on the right color. When I bought the materials, I had planned to wait until the comforter I ordered arrived before making a decision, but I like the green in the fabric I chose for the headboard, and I think it will make the fabric stand out a bit. Click here or on the swatch below to view the fabric.
